At that time, Prestashop has officially released the latest version 1.7, it brings news for user, we will start create some guides for the new version 1.7, we will guide customer some sample configurations through using default Prestashop modules. We also create details tutorials for Leo Modules. Thus do not worry about the latest version 1.7. Customer can leave us all question in our live chat about your concerns, we will summarize and create tutorial for you. Today, we will introduce a guide to add categories in Prestashop 1.7.
In terms of this blog, we – Leotheme Team – will show you How to Add New Category PrestaShop 1.7 – one of our Prestashop 1.7 Tutorial.
Here are the steps you should follow:
I. Add New Category PrestaShop 1.7:
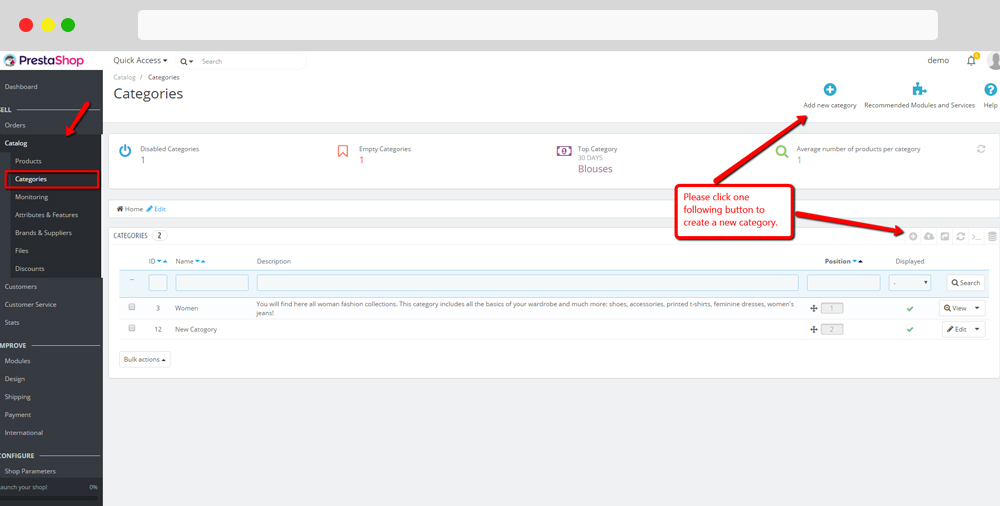
First step, you access into your back office to Catalog –> Categories.
You will see a table with the list of categories that are already on the store.
To add a new category, user press the “Add New Category” button.
II. Fill Prestashop 1.7 Category Information:
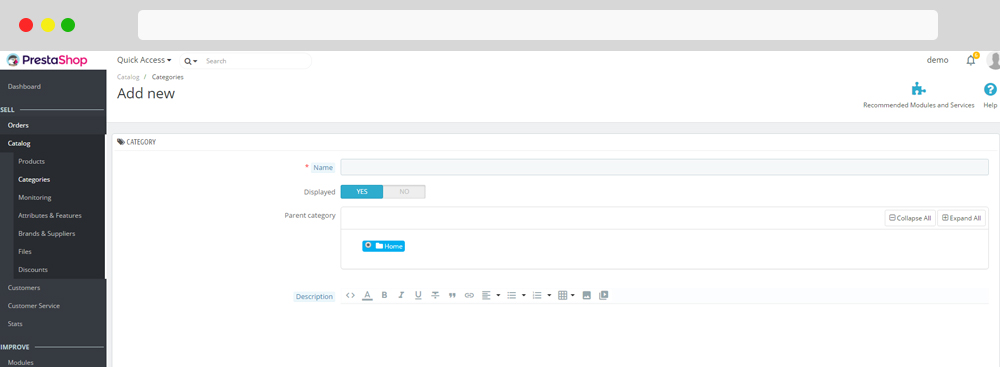
After that you will see a page and please fulfill this table with your information:
- Name: Enter Category Name
- Parent Category: Select Parent Category
- Description: Text for Category Description
- Category Cover Image: You can upload a big picture that will be used represent for your category.
- Category thumbnail: Up load smaller images than cover, they are used to describe category
- Meta title, description, and keyword – this is the description for SEO purposes.
- Friendly url- when you enter the name of category – this is how users can access your category
- Group access here you can define which groups can access your store.
- You have 3 groups that you can choose:
- Visitor – All people without a valid customer account;
- Guest – Customer who placed an order with the guest checkout;
- Customer – All people who have created an account on this site.
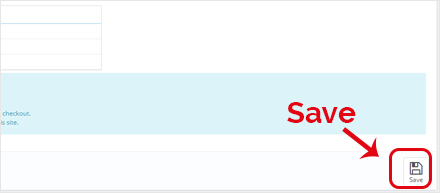
Then click “Save” button to keep your configure.
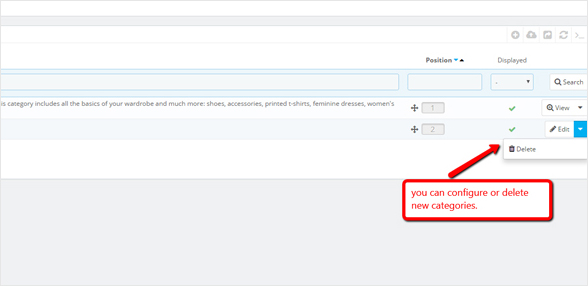
Your category has been save and you are redirected to the list of categories. If you want to add changes to the category, press “Edit”.
You can also change positions of your categories by dragging and dropping them to other positions.
You’ve successfully Add New Category Prestashop 1.7. We hope that this tutorial will help you well.
Related PrestaShop Tutorials Post:
- PrestaShop 1.7.x: How to Install PrestaShop 1.7 Default Theme
- How to Install PrestaShop 1.7 Default on Server | PrestaShop 1.7 Tutorial
- PrestaShop 1.7 Tutorial: How to Add New Category PrestaShop 1.7
- Quickly Update PrestaShop Theme 1.7 for Product Page & Category Profile
- New Theme Folder’s Structure of PrestaShop 1.7
- Prestashop 1.7 Is Released | PrestaShop 1.7 Features You Should to Know
- 10+ Secret Prestashop 1.7 SEO Tips to Get Higher Rank for Store
- PrestaShop 1.7: How to Add Shortcodes in Ap Page Builder Module – Leotheme
- PrestaShop 1.7 Tutorial: How to Add New Category PrestaShop 1.7
- 8 Secret Tips PrestaShop Security Best Practices for E-Store – Leotheme
 Prestashop Themes and Module Blog PrestaShop News, Tutorials & Marketing Tips




Hello there! Would you mind if I share your blog with my myspace
group? There’s a lot of folks that I think would really appreciate your content.
Please let me know. Cheers
Marvelous, what a website it is! This webpage presents helpful data to us, keep it up.
Its a really nice post to read and get info
Wow! Finally I got a webpage from where I can truly get
helpful facts regarding my study and knowledge.